My latest inspiration: paper flower adorned favor boxes
I saw these sweet little things at Jo-Ann the other day. They were priced around $10 for a pack of 6. Since I've already bought my favor boxes (100 of them for around $20 shipped from Uline), I set out to learn to make these sweet little blooms.

Here's what you need:
- Tissue Paper - the softer and thinner the better for puffier flowers as shown
- Beading wire - not sure what gauge I used, but it should be malleable enough that you can twist it easily with your hands
- Beading wire cutters
- Scissors
- Kraft boxes - got mine super cheap at Uline.com
Step 1: You'll need to cut small 3" x 3" squares (or size desired). You should need between 6 and 10 sheets for each flower.

Step 2: Line the sheets up and fold them accordion style. For smaller flowers, you'll want smaller folds. In the final pictures shown, my folds are around 1/4".

Step 3: Fold the sheets in half. Then with a short length of beading wire, loop around the middle and twist a few times. If you're going to want to attach the flower to something, it might be best to use a bit longer wire.

Step 4: Trim the ends of the paper. (I like either rounded or in a sharper V shape.)

Step 5: Holding the flower with the wire in your grasp, begin separating and pulling up the paper, one layer at a time.

Voila! You're done! Now you can finish it off by adding some color, attaching it to something, or wrapping the wire with some floral tape to build a stem.
Here are a few of my finished flowers:
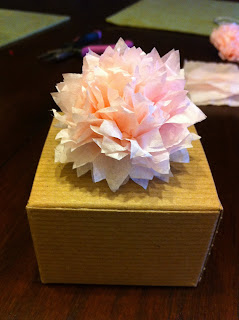

This is what I'm going to make for my favor boxes, but in a light pink.
Other examples: These papers are the same size, but I did sharper edges on one and rounded on the other.

I love how soft the round edged one is. So beeyootiful!
ReplyDeleteYou did a great job!